Unreal Engine 4 Basics
Opening Unreal Engine 4


Sometimes during this process your launcher will crash. If you simply exit the crash report window you should be able to continue on with opening the engine.
Now that you are logged in we are at the Unreal Launcher. This launcher provides a different things to you as a game designer. You will notice 4 different sections on the left of the window.
COMMUNITY - Epic will post new content updates and weekly streams here.
LEARN - This tab has videos, tutorials, and documentation about the engine and how to use all the features included. If you ever find yourself with a problem after the camp using UE4 check this tab out first as it will most likely have an answer to your problem.
MARKETPLACE - This section is where the community posts all of its assets for sale like Blueprints systems, props, and even entire levels.
LIBRARY - Here you will find all your engine versions you have downloaded and all your projects that you have worked on as well.
You will find a few other useful things in this window as well so don't be afraid to poke around and see what else Epic is offering here now.
Now we want to launch the engine, but first make sure you are going to launch the right version.

After the loading screen finishes you will see the Project Browser. Here you can launch projects you have already worked on, start a new project, or start a new template project.

Navigating around the editor
This is the main window of the UE4 editor and where you will spend most of your time. Let's take a look at all the different sections of the editor and try them all out.
FILE MENU - Starting from the top left you will see that standard file menu that exist in most software.
Get used to doing this often or just hit CTRL + S as Unreal Engine 4 WILL crash from time to time.
We'll get to this later but for now we just want to make sure it pops up down in the right hand corner.
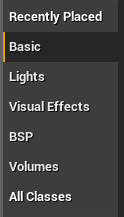
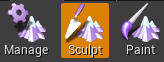
MODES - just below the FILE MENU is the MODES tab. Here you can cycle between what mode of UE4 you want to be working in.

These 5 types dictate where you want to place geometry, paint, sculpt the landscape, place foliage, or manipulate an asset's geometry.
You should by default be in geometry placement mode and see these tabs.
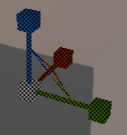
You've now added a cube to your scene, and will see it highlighted yellow with 3 arrows sticking out of it.
VIEWPORT - The window you just dragged the cube into is called the Viewport. This is where you will actually build and play your level.
Viewing and Navigating the scene
In order to make our way around the scene, treat it as a First person shooter.
By holding the right mouse button and using WASD to fly around and Q,R to navigate up and down we can travel through the scene in order to get better angles on the parts we need to work on.
While navigating the scene you can roll the mouse wheel to change how fast you fly around. Just in case you need to get somewhere faster or slower.
Scale, Rotate, Move
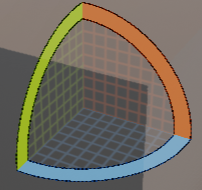
The cube is a bit small so we will scale it up. By pressing Space we can cycle through the 3 types of manipulation modes.
Cycle through until you see small squares, which indicate scaling.
 -Scale
The half circle rotate objects
 -Rotate
The arrows indicate movement
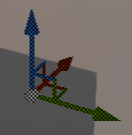 -Move
-Move
The yellow indicates all three axis' are being scaled the same.
Notice the numbers in the top right hand corner of the scene. these are our snaps. They set the increments in which we can transform our snaps. They set the increments in which we can transform our assets. The orange boxes indicate the snaps are on and the numbers tell us the amount of the increment. We will play around with these later.

One neat trick you can use to quickly duplicate objects is to hold ALT and drag the object in a direction while in Move mode.
You can also drop something to the floor if it is above it by pressing END.
APPLICATION TIME 1
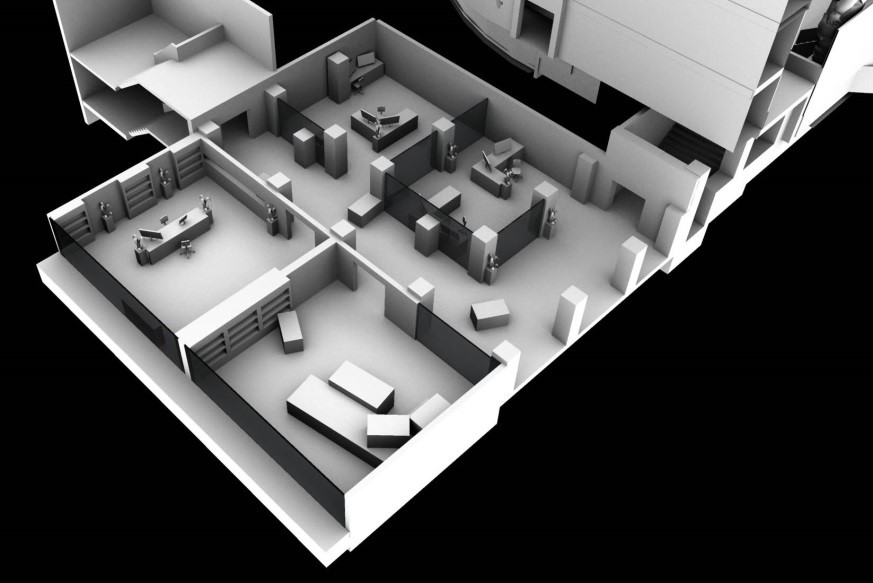
Greyboxing is what level designers do in order to quickly visualize what a space will look and feel like without working for hours on things like color, lighting, and effects.
Use only the 4 shapes (Cube, Sphere, Cone, Cylinder) and the basic manipulation tools.
Assume you are building a first person level like Halo, Minecraft, or Call of Duty
Make a maze the player has to find their way out of.
Use arrows to help guide them.

Moving this will change where the player spawns when the level begins.
TOOLBAR
Now that you have a greybox scene we need to test it out with the TOOLBAR menu just above the VIEWPORT.

The only other option we need to know for this camp is the BUILD buttons.
"Building" a level is the process of taking all the assets, like lights and shapes and having the computer calculate their effects on the rest of your level.
You seee trying to calculate all of the assets in a scene while you are building it is too hard even for modern computers so what the editor does is show you preview versions and simplified versions of all your assets
It isn't until your scene is actually built by clicking on this button will you know EXACTLY what your level will look like.
Always keep in mind when you see messages like this.

Building also can take a long time even with just a few assets so we will only be doing it a few times during camp.
DONT CLICK IT NOW, just find it. The arrow next to the build button opens a drop down menu and for now just take a look at the menu and find "Build Lighting Only." DON'T CLICK IT NOW. Just be aware of where it is.
WORLD OUTLINER
The world outliner just lists every single asset that currently exists in your scene. Sometime you will have invisible assets, or need to find something by name and this is where you will do that.
You will notice the camera in the Viewport automatically finds that object in the scene for you. This becomes very useful when you are sifting through 100s of assets in a scene
DETAILS
After you clicked on a cube in your scene you will see this panel update with information about this cube.
It is here you can input specific numbers for manipulating your cube, change the material, collision, and much more.
You should see a line called Mass in Kg and a number next to it. If it's above 200 that means your character probably will only be able to scoot it very little.
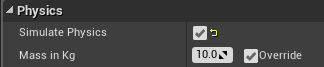
Now if you jump into it or push it with your character it should fly around the room, because you made it lighter.
We will talk more about physics later.
CONTENT BROWSER
The last panel we will talk about is the content browser
This panel contains all the assets you have imported into your entire project
These assets exist and are usable in your project, but may not necassarily have been placed in your scene yet.
MATERIALS
These are materials sometimes called shaders.
Materials are what give your assets all types of attributes like color, specularity, bumpiness and even some forms of movement
Textures are images like JPEGS that artists use to build Materials.
if you click on the "Textures" folder you will see plain images that make up each of the crate materials.
BSPs and Static Meshes
On the left we see what is called a Static Mesh and on the right a BSP (Binary space partitioning).
Static meshes are usually custom built assets in applications like Maya or ZBrush.
90% of a game is going to be made of static meshes.
On the right is a BSP
BSPs are used for quick prototyping of a level. If you change your tab in modes from Basic to BSP you'll see you can place different premade BSP asset in your level.
Also notice the material already applied to the 3 assets.
2 are stretched and distorted while the center one looks normal. The BSP when scaled using the details panel will automatically update the material while static mesh materials usually need to be custom built for that specific mesh.
When it comes to BSP's it also matters which side of the BSP you click on.
If you click on the top you will select the top face, but if you click on the side it selects a side face.
It doesn't matter where you click on a static mesh, it will select the entire thing.
Click on the BSP and change the Z coordinate from 200 to 400 and see how all the bricks stay in the shape of bricks.
Now try scaling the BSP with the manipulator and notice how the bricks stretch unnaturally like the one all the way to the right.
BSPs are useful because they allow designers to build levels without having to build assets outside of the editor.
Look at the next 2 BSPs along the back of the level.
The first one is 2 BSP cubes placed together with one going through the center of the other.
If you click in the hole you should see the invisible BSP selected and its properties appear in the details panel.
Notice how its brush type is changed to Subtractive meaning it will hide any other BSP space
inside it.

Note that this subtractive brush only works with other BSPs not Static Meshes.
On the next BSPs you can see another subtractive BSP creating a doorway.
The difference here is that the additive BSP has hollow turned on meaning the BSP won't
automatically fill but create more of a "room" shape.

APPLICATION TIME 2
You'll notice the BSPs cannot subtract away from your level because it is built with Static Meshes.
You can find some default Materials under the green Materials folder.
Make a room that is blocked by the stacked cubes that the player must push out of the way ot enter.
Once they are in the room have a sphere they must roll into a hole to fill so that they can cross
a gap without falling in.
LANDSCAPE
Click the Mountain square in the Modes tab to switch to Landscape mode.
You'll notice a large green square fill your screen. This is just a placeholder and not an actual landscape
Change the Quads to 7x7 and make sure the Section is still set at 1x1.
Assign the landscape_MAT to it at the top.
Then hit create and your landscape will now be ready to work with.
Now you'll notice if you paint on the landscape with your brush it raises up and if you hold SHIFT + paint it will go back down.
If your entire landscape is flashing blue that means your brush is much to big.
Change it 512

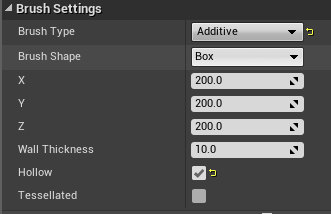
By using these 3 drop downs you can change the shape of your brush, what your brush does, and a few
other things as well.
One useful one is the ramp.
Use the ramp by placing one mountain on what you want to be the bottom of your ramp and the other at the top.
Adjust the width for your level and when your ready to place it hit Add Ramp.
Flatten is also useful for making paths, plateaus, and areas to place things on.
If you need to delete parts of your landscape or add more head to Manage> add or delete tool.
PAINT
You can see the landscape is all just dirt right now.
To paint on different materials like grass or sand switch from Manage to Paint.
Before you can paint the different layers you need to click the drop down box below each target layer and assign the layer information
There should be only one for each.
APPLICATION TIME 3
use all 3 landscape materials provided. (Grass, Dirt, Sand)
Make sure all your hills are traversable by the character, unless you don't want the player to walk up a certain hill.
Black areas are an Unreal glitch and need to be completely painted over before you can paint them more in detail.
Black seams will disappear when you build the lighting so don't worry about them for now.
Make your landscape into the shape of an L.
Sculpt a canyon that is blocked by a giant Sphere which will be our boulder that the
player must push off a cliff in order to progress past it.
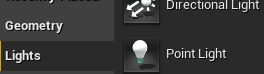
LIGHTS
Now we need to light up some areas with some light.
The rings around the light indicates how far the light affects.
Intensity - The light may be too bright for your scene or it may not be bright enough. The intensity is where we can change this.
Color - We can also change the color of the light say if we had a neon light or a flame. Here you can change the color to help reflect the mood of your scene.
Attenuation - This setting lets us affect those 2 rings we see in the scene. The lower the attenuation the smaller the area the light will effect.
Direction - This will only be useful to us when using a Spotlight.
If you click SkySpherBlueprint in the World Outliner you can see the details of the sky in the details panel.
Now when you scroll down in the Details panel and find the Sun Height slider, you can lower and raise the sun according to what time of day you wnat. Try making it night time by lowering the sun all the way. Use the settings below to quickly change the time of day.
- Night: -1
- Sunset: 0
- Day: 1
APPLICATION TIME 4
Make our scene night time.
Add spotlights that are coming from lightspot shaped meshes so it looks like that player
is on a street.
Make a traffic light like the one below.